PLT Hardware CI
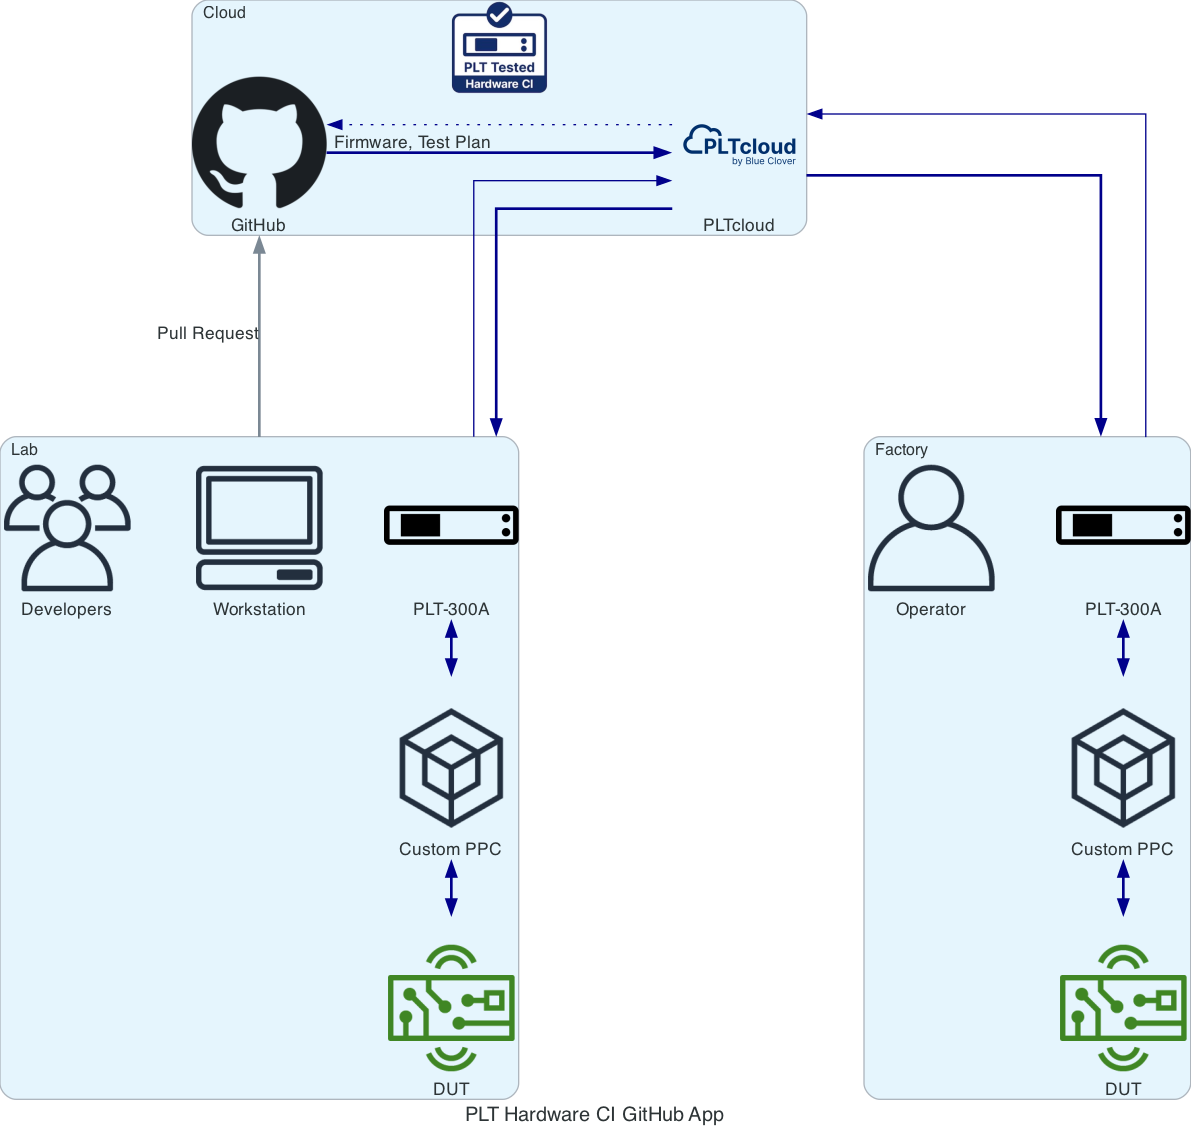
The PLT Hardware CI GitHub App enables Continuous Integration (CI) testing, automating the production-level testing of firmware on target hardware, using the PLT.
PLTcloud GitHub Action

-
Deploys firmware and test plan build artifacts to PLTs.
PLT Hardware CI GitHub App
-
Reports PLT test results back to GitHub Actions.
Setup
Prequisites
A GitHub repository containing DUT firmware images and test plans
A PLTcloud organization, user and project
An enrolled PLT associated with a deployment group that will be used for CI testing
Step 1: Validate firmware build and test plans
In order to upload a release, the PLT test plan, and any associated assets such as DUT firmware must be available in a directory.
Your existing GitHub Action workflow should build the firmware and copy test plans to a known directory.
For example, the
workflow
in the
Zephyr firmware for demo board project
uses the /.github/actions/action-zephyr action to build the firmware files and copy the test plans to a dist/ directory.
Step 2: Configure project and token secrets
Log in to PLTcloud and select the Project menu item from the project drop-down in the top banner.
Copy the
UUIDfrom the Project Details and add a secret namedPROJECT_UUIDin your GitHub project.Select API Tokens from the drop-down menu under the user menu in PLTcloud
Select Add Release Token, login and copy the Release Upload Token
Add the release token to GitHub secrets and name it
API_TOKENSelect the PLTs.
Click on the deployment group name that you want to use for Hardware CI (not the PLT name).
Copy the
UUIDfrom the deployment group detail page and add a secret namedDEPLOYMENT_GROUP_UUIDin your GitHub project.
External References
Step 3: Add PLT Hardware CI to repository
To enable the creation of a GitHub check runs, add the PLT Hardware CI App.
This will allow the results from the execution of the PLT test plan to result statuses that are visible within pull requests on GitHub.
Please follow the steps below:
Select the organization where you want to install the PLT Hardware CI App.
Choose the option Only Select Repositories and select the desired GitHub repositories.
Select Save
Step 4: Add PLTcloud deployment to existing action
Add a step in the
.github/workflows/main.ymlworkflow file, after the steps that build your firmware.- name: PLTcloud release uses: bcdevices/pltcloud-action@v1.2.1 with: FILES: ./dist/* API_TOKEN: ${{ secrets.API_TOKEN }} PROJECT_UUID: ${{ secrets.PROJECT_UUID }} DEPLOYMENT_GROUP_UUID: ${{ secrets.DEPLOYMENT_GROUP_UUID }} AUTO_DEPLOY: true VERSION: ${{ github.ref }}
Step 5: Add Report Connector to PLTcloud Project
The Report Connector is used to update the status of the GitHub check run after your test plan has been executed.
Log in to PLTcloud and select the Project menu item on the left side of the screen.
Click on the name of the relevant project.
Click the Report Connector button at the top of the page.
Click the Add Destination button at the top of the page.
Enter
pltcloud-ci-reports-productionfor S3 Bucket.Enter
us-west-2for Region.Select
jsonand Add.